


Trips and Alerts Help
Help Overview | Map Help | Reports Help | MyTravel Help | Trips and Alerts Help
Introduction
The Travel Midwest Trip Alerts System allows you to define a trip along expressways in the Travel Midwest coverage area, and then view current traffic information for the trip, or sign up to receive email alerts about selected traffic information along the trip. A trip can span multiple expressways, e.g. you can define a trip from Oak Park to Matteson that begins at Austin Avenue on I-290, continues on EB I-290 to the intersection with I-90/94, exits and continues south on I-94 until I-57, exits and continues south on I-57 to its end point at the US-30 exit from I-57. The Travel Midwest Trip Alerts System feature does not perform route finding.
The Travel Midwest Trip Alerts System uses the following pages, which are available on the "trips" menu:
- The Trip Map page - allows you to define a trip along expressways by clicking its start and end points on a map, and by clicking connection points as well if it spans multiple expressways
- The Trip Report page - allows viewing current traffic information for a trip defined on the Trip Map or selected from the trips saved in your Trip Alerts account
- The Trip Alerts Registration page - allows you to register to receive email alerts about selected traffic information along a trip
- The Trip Alerts Account Log In page - allows you to log in to your account so that your trips are listed on the Trip Report and you can manage your account information (you will remain logged in unless you log out)
- The Trip Alerts Account page - allows you to manage your account information, trips, and alerts preferences
- The Trip Alerts Password Request page - requests the system to generate a new password and email it to you (the system cannot remind you of your current password because it is encrypted in the database for your privacy)
- The Trip Alerts Account Log Out menu item - allows you log out from your account, e.g. if you are on a public computer or someone else uses your computer
The Trip Map
You use the Trip Map page to define a trip. The page presents a map of the Travel Midwest coverage area, initially displaying the Chicago area. Markers are displayed along the expressways where there are entrances or exits and connections from one expressway to another. You define your trip by clicking on these markers to select the start point, expressway connections, and end point of your trip. The Trip Map page initially appears as follows:
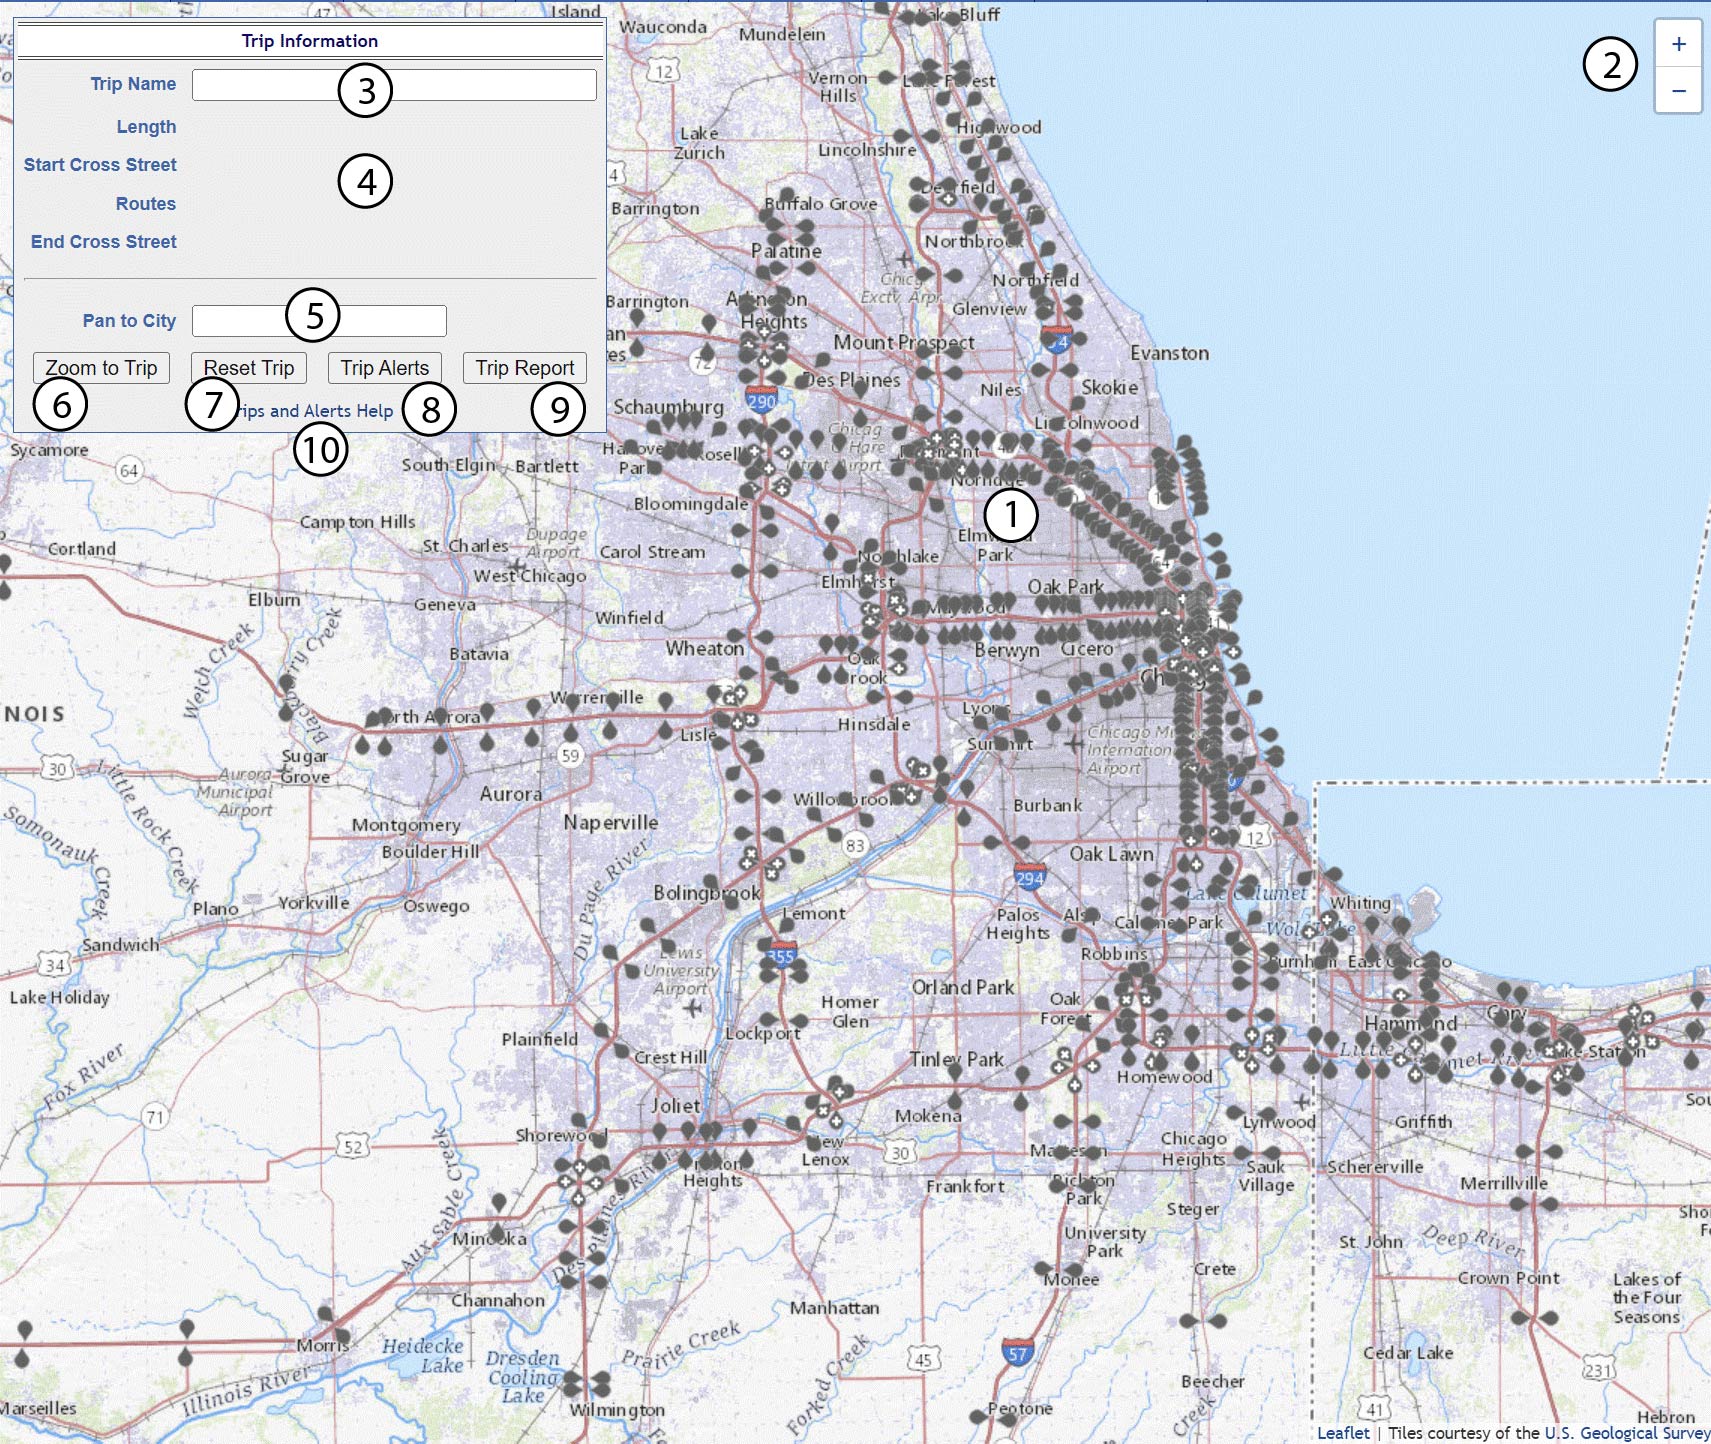
The items on the Trip Map page are:
- The map - Like online maps that you are familiar with, you pan the map by dragging with the mouse and zoom in or out with the mouse scroll wheel or the "+" and "-" buttons in the upper right corner.
- The zoom buttons: the "+" buttons zooms in and the "-" button zooms out
- The Trip Name - a field in which you can enter a name that you choose to identify the trip
- The Length, Start Cross Street, Routes, and End Cross Street - these fields display information about the trip on the map and are updated as you choose trip points
- The Pan to City field - You can enter the name of a municipality in the Travel Midwest coverage area to pan to that location (the zoom level is not changed). The field performs "auto-completion": when you type two or more letters in the field, a drop-list appears with the first ten municipalities in the coverage area that begin with those letters.
- Zoom to Trip - pans and zooms the map to the trip
- Reset Trip - clears the trip
- Trip Alerts - goes to the Trip Alerts Registration page where you can register for an account and define your alert preferences for the trip or if you have an account, to the Update Trip Alerts Account page where you can add the trip to your account and define its alert preferences
- Trip Report - goes to the Trip Report which displays curent traffic information along the trip
- Trips and Alerts Help - a link to this page for viewing help on the Trip Map, Trip Report, and Travel Midwest Trip Alerts System
You can drag the Trip Information panel wherever you like on the page so that you can see what you need to on the map. Since the entrances and exits along expressways in Chicago and other cities are close together at the initial zoom level, you may have to zoom in to select the correct marker on those roads.
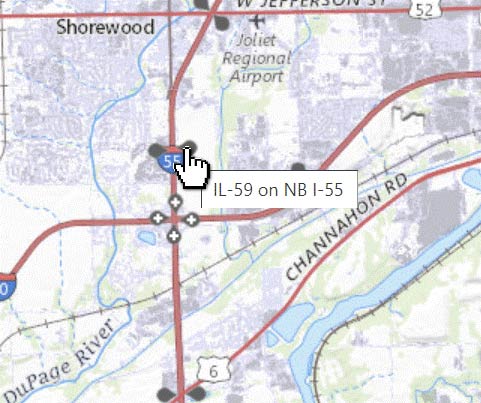
Each marker points to an intersection on an expressway, and when you roll over the marker with the mouse, a tool tip will identify the location of the marker. For example, if you zoom to the intersection of I-55 and I-80 and hover over the marker on the northbound side of I-55 just north of the intersection, you'll see that the marker identifies the IL-59 crossing on NB I-55:
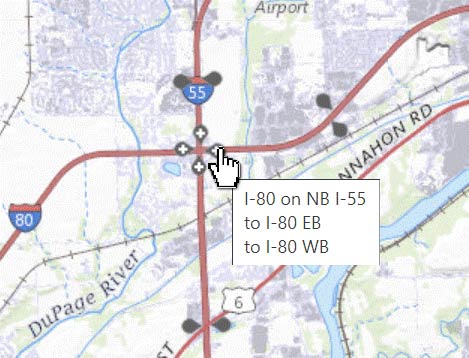
Markers that include a white cross indicate crossings between expressways and when you hover over the marker, the tool tip lists the expressway connections as well as the location of the marker. For example, if you hover over the marker just south of the marker in the previous snapshot, you see that you can connect from NB I-55 to EB I-80 or WB I-80 at that point:
To define your trip, you begin by clicking on the marker at the start point. When you do so, the map displays only the markers that can be selected as the next point along the trip. If the trip is on a single expressway, click the marker at the end point to define the trip's path. If the trip spans multiple expressways, click on the connection marker that connects to the next expressway in the trip, and so on until the end marker. Once you have defined the trip path, give the trip a name and then you can add it to your Trip Alerts Account or view traffic information for the trip on the Trip Report.
For example, suppose we want to define a trip from New Lenox to O'Hare Airport, entering the expressway system at US-30 on EB I-80. First we click on the start marker, and then the map displays all the succeeding marker on EB I-80:
The start marker is colored blue to show that it is part of the trip. As you can see, only its successors on EB I-80 are displayed because those are the only valid choices at this point. You can also see that there are connections to I-355, I-57, and I-94 and IL-394. The Trip Information is also updated:
The next step is to select the connection marker for I-355 so that we can transfer to that expressway. When we do so, the map displays all the successors via the connections at the connection marker as well as the successors of the start marker, in case we change our mind about the second point or made a mistake:
Both the start and connection markers are colored blue, as is the trip path. If you hover over the trip path, a tool tip describes the trip location, "US-30 (Lincoln Hwy) on EB I-80 to I-355 (Veterans Memorial Twy) on EB I-80" in this case. The Trip Information is also updated with the trip length and end cross street:
Next we want to continue north on I-355 to I-55 so we select the marker I-55 on NB I-355, and the map updates the trip path and displays the markers northbound and southbound on I-55, starting at I-355:
The markers northbound along I-355 are also displayed in case we need to change the last selection. In addition, the markers along EB I-80 are still displayed in case we wish to undo the choice of I-355 on EB I-80. In general, when there are several connections, the map allows undoing the last two choices made. If you need to undo further back, when you undo a connection, the valid next markers are always displayed for the last two choices so you can undo as much as necessary. You can always start over by pressing the "Reset Trip" button. The Trip Information is also updated, and now shows two routes:
Next we want to continue north on I-294 so we select the marker I-294 on NB I-55, and the map updates the trip path and displays the markers northbound and southbound on I-294, starting at I-55:

Note that the Routes field displays all five expressways for the trip. Now we can press "Trip Alerts" to add the trip to our alerts account or "Trip Report" to get current traffic information along the trip.
The Trip Report
The Trip Report uses detector readings and other data to calculate current approximate travel times along an expressway trip of your choosing. It also shows incidents and construction on that trip. You can then view the current estimated travel time at each point along the trip as well as whether there are any accidents or construction projects along the way. In addition, the system supports saving trips to your Trip Alerts account for quick viewing of their traffic information and receiving customizable email alerts about real-time traffic conditions along the trip.
You can access the Trip Report directly from the "Trip Report" menu item on the "trips" menu to display traffic information on any of the trips that you have saved to your Trip Alerts account. You can also access the Trip Report from the "Trip Report" button on the Trip Map, in which case it displays traffic information for the trip defined on the Trip Map. In the first case from the menu item, the Trip Report appears as follows if user@somewhere.org is logged in:

The items on the initial Trip Report are as follows:
- The Trips for email drop-list - lists the trips in the logged in user's Trip Alerts account and allows selecting a trip
- Show Traffic Information - displays current traffic information for the selected trip (details below)
- View Trip Map - displays the selected trip on the Trip Map
- Updated Time - the date and time the information in the report was last received, which does not indicate the last update of all information on the report
- Trips and Alerts Help - a link to this page for viewing help on the Trip Map, Trip Report, and Travel Midwest Trip Alerts System
If no alerts user is logged in, the Trip Report displays a message to that effect:

If the logged in user has not defined any trips, the Trip Report displays a message to that effect:

If you are logged in and have one trip only, that trip is selected in the drop-list and the page displays the Trip Information and a table of current traffic information with a section for each expressway along the trip as discussed in the next paragraph.
If you select a trip and press "Show Traffic Information", the page displays the Trip Information (like the Trip Map) and a table of current traffic information with a section for each expressway along the trip. The table contains rows for each cross street on the trip showing the travel time from the start cross street to that cross street, until the end cross street, which gives the total current travel time for the trip. Each row also displays additional information about the road section between that cross street and its predecessor in the table. For example if we press "Show Traffic Information" for our "New Lenox to O'Hare" trip, a report like the following is displayed, with sections for the five expressways on the trip:
The items in the traffic information on the Trip Report are as follows:
- Congestion Legend - gives the meanings of the congestion colors used on the report. If you have difficulty distinguishing the congestion colors on the map and reports, you can click on the ADA icon next to "Uncongested" to open a window that lets you set the color used for "Uncongested" to blue, which is easier to distinguish from the red for "Heavy" and the grey for "Unknown". Clicking on the "info" icon displays a detailed description of the congestion levels.
- Expressway Name - the name and direction of the expressway for this section of the table
- Cross Street - the cross street for which a travel time from the start point is specified
- Mile Marker - the mile marker of the cross street, if any
- Congestion Status - a general measure of the congestion for the segment between the cross street and its predecessor
- Speed - the average speed in miles per hour for the segment between the cross street and its predecessor, which will most likely not be constant along the entire length of the section
- Average Speed - the historical average speed in miles per hour for the segment for the current day of week and time of day
- Travel Time From Start - the time in minutes calculated by the Travel Midwest site for travel on the expressway from the start cross street to this cross street
- Incident End Time - If there is an incident on the road section between the cross street and its predecessor, the estimated end time of that incident. The time is also a link to the Incident Report displaying that incident. If there is more than one incident on that section, the most severe is displayed
- Incident Severity - If there is an incident on the road section between the cross street and its predecessor, the severity of that incident. The severity is also a link to the Incident Report displaying that incident.
- Construction End Time - If there is roadwork on the road section between the cross street and its predecessor, the estimated end time of that roadwork. The time is also a link to the Construction Report displaying that roadwork. If there is more than one roadwork on that segment, the most severe is displayed.
- Construction Severity - If there is roadwork on the road section between the cross street and its predecessor, the severity of that roadwork. The severity is also a link to the Construction Report displaying that roadwork.
For example, when the above screen snapshot was taken, there was construction on NB I-55 and WB I-190 but no accidents along the trip. If you wish to update the traffic information on the page, press "Show Traffic Information".
There are expressway sections for which there is no detection equipment or for which the equipment is not functioning. In this case, travel times cannot be computed so the Trip Report uses archived traffic information for the current time of day and day of week. For example, there is no detection on I-80 in Iowa. If you select IL-82 on WB I-80 as the start point and US-61 on WB I-80 as the end point and then press "Trip Report", a report like the following is displayed:
Below the form, there is a note to the user about the lack of detection on I-80 WB from US-67 to US-61 and the congestion level and speed for the last three cross streets is unknown. (Incidents and roadwork on those segments are still displayed.) The values in the Travel Time From Start column for the last three rows are computed based on historical data.
If you define a trip on the Trip Map page and then press "Trip Report", the Trip Information and Traffic Information table for that trip are displayed in the same manner as above, but there is no form for selecting a trip.
Travel Midwest Trip Alert Accounts
The Travel Midwest Trip Alert System sends email notifications containing traffic information about the conditions along selected expressway segments to users registered for the system. The service is free. You may register for alerts for any number of trips, and the format, contents, and timing of the alerts for each trip are customizable. You may also add trips to your alerts account so that they are available on the Trip Report without receiving alerts for them. To register to receive email alerts about traffic conditions along a trip, specify the trip on the Trip Map and press the "Trip Alerts" button. If you do not have an email alerts account, you will be directed to the Travel Midwest Trip Alerts Registration page, which includes instructions on how to register. If you have an account, you will be directed to the Update Trip Alerts Account page with the new trip added to your account and selected in the table of your trips.
If you navigate to the Trip Alerts Registration page from the Trip Map, the page is divided into two sections, one for user information and one for alerts preferences for the new trip. When you go to the Trip Alerts Registration page from the menu item, there is no alerts preferences section. In the User Information section, you give your email address, a password for the Travel Midwest Trip Alerts System, and whether you want formatted or plain text alerts. You can also give a time period during which you do not wish to receive alerts, e.g. while you are on vacation. Your password must be at least eight characters and contain characters from at least two of the following categories: lower case, upper case, digits, and symbols.
The Alert Preferences section is divided into two subsections. In the Alert Schedule subsection, you give the days of the week and the time of day during which you wish to receive alerts, and the frequency during that time period. You may also specify that the system only notify you when the average speed along the trip is below a given speed. In the Travel Information subsection, you specify the types of travel information you wish to receive: travel time, congestion, construction, and/or incidents. The "Sample" links next to each choice display a formatted example of the alert for each type of information. If you have decided to receive incident notifications, there are further customization options. You may specify the severity of incidents that you will be notified about, and may indicate that you wish to receive notification of all severe incidents along the trip, even those that occur outside your given time period. If you are adding the trip to your account only to view its traffic information on the Trip Report when you wish to see it, check the box labeled "I do not wish to receive alerts for this trip".
The Trip Alerts Registration page includes a "captcha" to ensure that the registration is being submitted by a human. Your Travel Midwest Trip Alerts account is created when you press the "Register" button at the bottom of the page, but it is not activated immediately. You will receive an email notification that your account has been created, which will include a link that you must follow to activate your account and receive alerts. The purpose of this procedure is to ensure that the person who filled out the registration form is the person at the account's email address.
If you already have a verified Travel Midwest Trip Alerts account when you press "Trip Alerts" on the Trip Map page, you will directed to the Update Trip Alerts Account page. If you are not logged in, a login form is displayed in which you enter your email address and password. Once you log in (if necessary), the Update Trip Alerts Account page displays three sections: (1) your User Information, (2) an Alert Trips table listing the trips for which you are registered with the new trip added and selected, and (3) Alert Preferences for the selected trip, the new trip in this case. You may edit the alert settings for the new trip and then press "Update Account" to update your account. A dialog will inform you that your account has been updated and you will stay on the Update Trip Alerts Account page in case there are other updates that you wish to perform. The new trip and its preferences will be added to your account and you will begin receiving alerts when your specified time period begins.
If you wish to edit the user information or alert settings for your Travel Midwest Trip Alerts account, select the "Update Alerts Account" item from the "trips" menu. If you are not already logged in, a login form is displayed. Once you log in (if necessary), the Update Trip Alerts Account page displays your User Information and the Alert Trips table. You may edit your user settings and then press "Update Account" to update your account. If you change the email address on your account, it will be marked as unverified and you will receive an Email notification at the new email address, which will include a link that you must follow to activate your account and receive alerts. You can delete your alerts account by pressing "Delete Account".
The Alert Trips table includes a radio button at the beginning of each trip row, and three buttons below the table for operations on the selected trip: "Edit Alert Preferences", "Edit Trip Route", and "Delete Trip". If you wish to edit the alert settings for a particular trip, select the radio button for that trip table and then press "Edit Alert Preferences". The alert preferences for that trip will be displayed, which you can then edit. Pressing "Update Account" will save the settings for the displayed trip as well as your user settings. If you wish to view or edit the route or name for one of you trips, select its radio button and press "Edit Trip Route" and you will be redirected to the Trip Map displaying that trip. Adjust the trip as necessary and then press "Trip Alerts" to return to the Update Trip Alerts Account page where you can save your settings. If you wish to delete one of your trips, select its radio button and then press "Delete Trip". (Pressing "Update Account" is not necessary in this case.)
If you have forgotten the password for your Travel Midwest Trip Alerts account, select the "Alerts Password Request" item from the "trips" menu. Enter the email address for your account and press "Send Password" and a new password will be generated and set on your account and mailed to you. (The system cannot remind you of your current Trip Alerts account password because it is encrypted in the database for your privacy.) You may then go to the Update Trip Alerts Account page, log in with the generated password, and then change the password to one that you can remember.